DIY for Pro iMac Users
Do you consider yourself a pretty good do it yourselfer? Do you want to upgrade your iMac? Whether you are a seasoned pro or a little wary of doing some of the more technical upgrades, this article is for you. If you have a pretty good knowledge of computer parts as well as patience and the ability to follow directions, you can upgrade some things on your iMac all by yourself. Some of it can be tricky, but it’s nothing a little hard work and determination can’t take care of. And once you get started, you’ll be rewarded for your efforts as there are plenty of components that you can upgrade in your iMac.
The Easy Upgrade - RAM
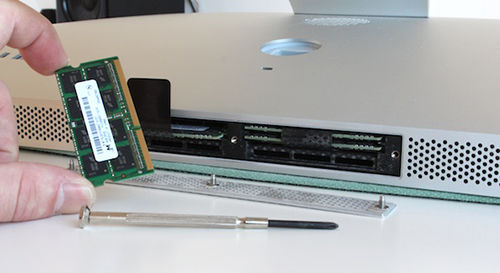
If you don’t think you can do a huge upgrade on your iMac, at the very least you can upgrade your own RAM if you have the 27-inch iMac. The 21-inch iMac has some models that can have an upgraded RAM and some that don’t. If your model has RAM soldered on, you won’t be able to upgrade it.
To upgrade the RAM on your iMac, all you need is a screwdriver. You simply remove the hatch on the back of the screen to upgrade to more RAM. You’ll be in and out before you know it.
Upgrading SSD/HDD
This type of upgrade is great for helping you get a little more use out of your iMac. Instead of purchasing a new device, you can make your hard drive even better! If you want to upgrade the SSD or HDD, you will need a couple more tools. You’ll need a screwdriver and some suction cups. Then, of course, you’ll need your new SSD or HDD.
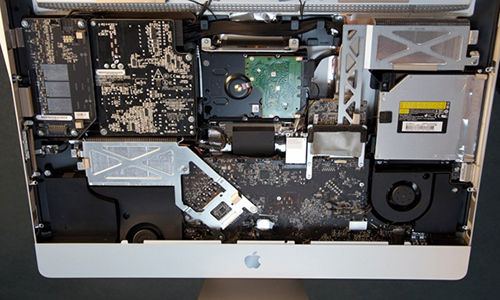
To begin, you need to unplug your iMac so you don’t electrocute yourself while you’re inside of it. You will want to lay it on its backside and place two suction cups at the top corners. Next, gently lift upwards on the glass panel. You will need to do this enough to clear the steel mounting pins that are attached on the underside of the top edge of the screens glass panel. Then you can remove the glass panel and set it to the side carefully, preferably on a dust free surface.
You’ll then need to remove the eight screws that attach the display to the outer case. Lift upwards slightly on the top edge of the display. There will be lots of cables attaching the display, so be careful not to lift too much.
The next step is to pull the vertical sync ribbon cable until you can remove it from its socket on the LED driver board. It’s going to be located on the top, left corner of the iMac. You can simply pull the cable away from its socket and towards the optical drive side of the iMac.
Next, rotate the display from its outer case enough that you can disconnect the LED backlight power cable which is located on the LED driver board. You can do this by pressing down on the locking mechanism while at the same time pulling the connector from its socket. Then, you will need to squeeze the two display data cable connector arms together so you can get it out of its socket.
You will next need to disconnect the LCD thermal sensor cable. After that, make sure you carefully pull the display towards the top edge of your iMac. Lift if from the outer case, being careful not to catch any of the cables that might be in the way.
This step is important. Make sure you note how the thermal sensor cable is orientated. If you install it the wrong way, the fans will not run at full speed. Disconnect this thermal sensor. Pull the connector away from the side of your hard drive.
The next step will require you to disconnect the SATA data cable. Pull the connector away from the hard drive and use the flat end of a spudger to help you disconnect the SATA power connector from the hard drive. You will next need to remove the two 9 mm screws that are holding the upper drive bracket to the outer case.
Now, you must ever so slightly rotate the hard drive out of its outer case and lift upwards on the mounting pins. Remove two more screws that are securing the upper bracket to the hard drive and remove the top bracket from the hard drive. There are two T8 Torx pins that you will need to remove from the other side of the hard drive. Then, peel the piece of EMI foam that is attached to the front of the hard drive and remember to attach this on your new hard drive.
Now you can relax. You made it this far, and now you just have to replace everything after you have put in your new hard drive.
*Please beware this is for information only and that any warranty you have will be void if you decide to carry work out yourself.
")
")
")
")
")
")
")
")

")
")


")
")
")
")


