Whether you're switching on a new MacBook Air M1 for the first time or setting up your well used Air after some much-needed R&R, there are some important things that should be done up front to get it going.
Let’s dive into some of the most important moments you need to know when you set up your new MacBook Air. Also we will tell you about some commonly overlooked features.
MacBook Air Set Up Tips
The best way to get the most out of your new MacBook Air purchase is by following these simple tips. From setting up a network connection, installing programs automatically with App Store updates or manually from Finder navigation bar; all-inclusive battery life management with energy saving modes like optimised web browsing & system performance - there are many ways you can make sure that this laptop lasts as long (or longer) than any other device in its class.
Setup Assistant (restore your files or start fresh)
When you're setting up a brand-new MacBook Air, the macOS Setup Assistant makes it easy. You'll be prompted to connect with your Apple ID and choose things like location or language before being guided through each step in simple onscreen prompts that will help set everything about this computer just right for your work. You can also create an Apple ID with the Setup Assistant if you don't already have one. The process is easy and straightforward, so it won’t take long before your new account is ready for use.
When you set up your MacBook again, the Setup Assistant will give you an option to restore old data and settings from either a Time Machine backup or another Mac via Apple's Migration tool.
The best time to transfer your data and settings from an old computer is now, Apple's software makes this process straightforward. While it is possible to access your old data once you've finished running through Setup Assistant and connecting the internet, there are some drawbacks. For starters- if like me (and most people) use one of these services like iDrive or Backblaze for cloud backup on their devices then they'll need to wait until after finishing those processes before being able restore anything at all using the internet connection.
Check for updates

With the always-on, digital world we live in today where most software is updated regularly to patch security holes and add new features for users--it's important that you stay on top of your game by installing updates as soon as they're available. When you're setting up your MacBook Air, the best time to check for updates is after completing Setup Assistant and connecting it online. This will ensure that macOS is running the latest edition as well as verifying all installed apps are updated too.
Thankfully, macOS makes checking for updates a straightforward process. Click on the Apple logo in your MacBook Air's top left corner and navigate to System Preferences > Software Update.
The Software Update menu will let you know if there are any outstanding macOS updates to install. If this is the case, just click “Update Now” and begin installing them. You can have your computer check for software automatically by checking off that last box at the bottom of the screen too.
Customise your screen to suit you
By default your Mac is set to a standard screen scale and brightness setting which may not be suitable for you. Customising these settings early on in the setup process can help ensure that they're how YOU want them.
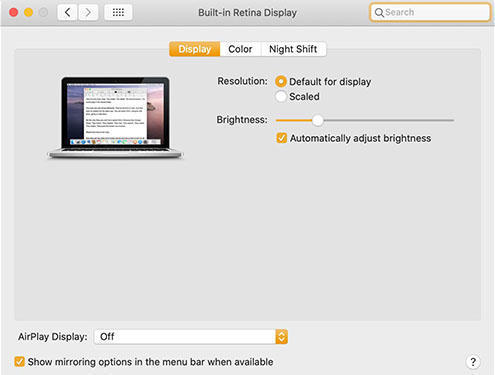
To change the resolution of your monitor, you have to open up System Preferences and go into Display. Click on Apple in the top left corner until it says then navigate to System Preferences > Displays. You can choose to have your resolution set as Default for Display, which will provide you with a good balance between seeing all the information on screen and not being overwhelmed. However, if reading small print is difficult then I recommend switching it into Scaled mode so that there are larger font sizes or making text less dense--this way more things stay readable at once. If you are not sure what setting to use, play around with this and see which one looks best for your eyes. Then select the option that feels right.
There are a few other options in this menu you can use to customise how your Macbook Air's display looks. You could manually adjust the brightness up or down by sliding the Brightness bar accordingly, and if it bothers you that Automatically adjust brightness feature then uncheck its checkbox. You can also click the "Night Shift" button in the lower-right corner of the Displays menu to customise your feature for a warmer tone after dark. This may help you sleep better if planning on doing some late night computing by cutting down blue light received before bedtime. To set your preferred schedule and temperature, use the tools in the Night Shift menu. You can also slide a bar between more or less warm to preview what it will look like before making any changes on this screen.
Set up Touch ID
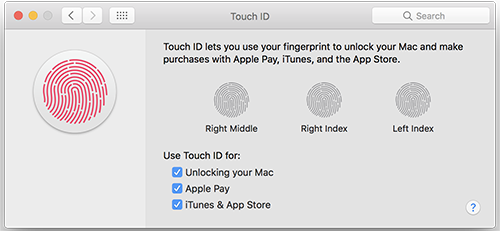
Since 2018, the MacBook Air has had a Touch ID sensor built into its keyboard. This means that you can log into your Mac with just one tap of your finger. To register more than one fingerprint for use with Touch ID, click the Apple icon in your desktop's top left corner and navigate to System Preferences >TouchID. There you will find an option called "Add Fingerprint" which allows users to add their prints as needed so they never have trouble logging-in again. If you have an Apple Watch, it's a good idea to enable the option that allows for hands-free access. To do so hit ‘Apple’ again and navigate through System Preferences > Security & Privacy, then use your watch to unlock apps.
If you are looking for a MacBook, please check out our selections of refurbished MacBooks Air.
")

")

")
")
")
")


")


")
")
")


